This is my little place for my creativity.

UPDATE: THE SITE IS MOVING AS OF FEBRUARY 10, 2014 TO:

http://www.emilylikestomakestuff.com


It's time to move on to a place that is more DIY for this DIY-er. Please come on over to see what is up, comment, make suggestions, stalk, or just say hello.
The links are all the same--I have trouble clicking on tiny stuff on my phone so I thought that having it over a few lines of text might make it easier for folks like me.

~~~~~~~~~~~~~

This is more or less a record of my crafty pursuits. I'll use this space to keep track of promising ideas and my own successes or "learning opportunities" for future reference.

Comments are welcome, but will be removed if they don't actually contribute to the content. In other words, comments should have all meat and no time-sucking fillers.

As I complete the projects/ideas on the right, I'll move them to the left so you can see how well it worked out.

Thursday, August 25, 2011

Emily's Guacamole & How to cut an avocado

Carlos, this posting is all for you.  (No, not that Carlos. This is for my best buddy from Madrid.)

Seriously, I know this is one of the easiest crowd-pleasers to make.  But, often,when I get it in a restaurant, it is not so great.  If you have never had it made fresh and right, you have never had it really good.  Here's how I do it and you can, of course, supply your own variations.
Here's how to prepare your avocado.  
1.)  Slice it lengthwise.  You can go crosswise, but long is easier.
2.)  Twist it to separate the halves.
3.)  Visualize the pit/seed.  
4.) Holding the half in your hand, strike the pit with your knife blade to sink it in just a bit.  Usually I don't go deeper than a screwdriver.  A sharp knife is better here.  A dull knife will slide off and hit you.  Has this ever happened to me?  Yes.  But I have never gotten cut.  I am not striking with enough force to chop down a tree--just enough to slightly hack into the pit.  
5.) Holding the half securely in your hand by the peel, twist the pit using the knife.  It normally will come right off.
6.)  I have used this method for more than 20 years, including working at Taco Villa.  It has only failed me 2 times, both of them today.  Thank you, Murphy. (I just dug the pits out with a spoon along with all the woody chips that I had hacked off-haha.) 

Ingredients: 1 jalapeño, one small onion (I like yellow ones), a lime, clove or 1/2 spoon of garlic, maybe 1/2 teaspoon of salt and 1 avocodo (or 2), very ripe.
Note:  Your avocado must be black on the outside (unless it is a giant one from the Caribbean) and a bit squishy.  (This is the problem with most restaurants, the avocados aren't even ripe.  They are usually still hard and not ready to be eaten.  This, my dear, is the true secret to good guacamole!

Last night, I got a bag with maybe 12 or 14 avocados for a dollar.  Why?  Because they were all RIPE now.  Perfect.  I am in true guacamole mode today!

To make things easier, if you want, throw your lime juice in the blender with your pepper to grind it up.  You can throw in the salt and garlic, too.  It is much easier than trying to chop them up.  Mash up your avocado, blend in your other ingredients and add the chopped onion last.  Let it set for a few hours to supreme goodness.

One more note.  How to chop an onion safely.  I am not sure why folks like to sometimes slice it like for a hamburger and then try to chop it while holding it in their hands like that.  It seems like a sure fire way to end up in the ER to me.  (Not that I am saying that I have ever seen that, nope, not me, never heard that from anybody.  HINT HINT)

Just humor me and do it like this.  Slice your onion in half and peel the outer 1 or 2 layers back.  If you leave them attached, you have a sort of a handle to give you a bit more control.  Slice it lengthwise and then down the flat part that is not touching the cutting board.  Ta da!  Perfection!  No blood.  No injuries.  No stitches.


If you won't be serving it right away or if you were out of lime, you can place the pit in the bowl to protect the color.  Blackened guacamole is still delicious, but a bit gross looking.
One more note:
If your limes are smallish, Key-limes and they are old, the juice may be very bitter.  I still like it, but it may not be the favorite for your friends from Spain.  (Carlos, I have a baggie of perfect-guacamole in the freezer for you right now.)

Cake #1-Baker's Recipe

I am planning to try to experiment with cake options until I find the one(s) that I want for that upcoming event in the spring.  Here is my first attempt. 

First, this is the site that I discovered the recipe at:
My Baker’s Crush: BAKED (and The Whiteout Cake)

This cake was the most labor-intensive cake I have ever made thus far.  The batter was promising and really seemed to be hinting at a total winner. 

Then I removed it from the oven.  First off, my home smelled like cake, but not heavenly as often occurs.  It looked okay, but not mouth-watering.  The texture was "okay" and the flavor was good, but certainly not better than the throw-it-all-in-and-stir type of cakes. 

Overall, I'd recommend this cake to no one.  On a scale of 1-5 with 5 being incredible and 1 being dogfood, I'd rate this a 3. Almost a 2 because of the work involved.

The icing was interesting.  It is a boiled icing and honestly, it was disappointing to say the least.  I grated some lime zest into it for some kick and that gave just an essence of oomph.  Much better, IMHO.  I'd only use this in the future as a filling for something like a Twinkie.  Seriously, that is exactly what this icing was like.  If I ever make those icing doughnuts for anybody, this is what I'll fill them with.

I debated about washing the rest of the icing down the drain, but figured that I have plenty of Zip-locs and freezer space so why not keep it. 

Getting ready.  I don't have cake pans yet so I made do with these goofy flowery ones that I re-discovered in my kitchen.  The towel strips are to help keep the tops even.  I'll have to try one with and one without to experiment on the difference.

I don't have enough space to do 3 layers so I cup-caked some extras in little heart shaped foils that I got on sale for almost nothing.  This was after 25 minutes.

Cooling down.

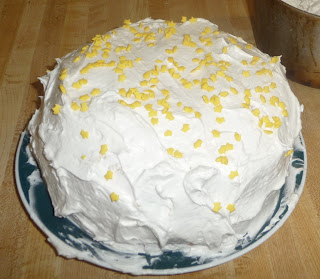
Ready for icing.  The icing took a long time and is the mirror of Twinkie filling.

A cake decorator I am NOT so..I made do by sprinkling on some little yellow "crowns" that I got on sale last night.  The sprinkles came in a set of 4 kinds--yellow crown, blue high heels, red apples, and pearls.  I really wanted the pearls to top the wedding cake.  Looking at my lack of talent here, if I don't improve by spring, we will NEED those pearls to distract from my mess!

Friday, August 19, 2011

Purse pocket for diaper and wipes.


This is a handy item to avoid having a diaper with crumbs or your lipgloss tucked inside.  You don't always need a bulky diaper bag--sometimes you only need to GO.  This is perfect for that.

Here's the link:
Bookcover/purse diaper pocket

Here it is opened with two folded burp clothes inside.

Baby Burp Towels

I made em.  I think they'll be handy.

I can't remember where I saw these online, but the idea is so simple.  Plain quilting cotton in whatever pattern, back it with a cut of towel.  I used a quilting template that was square and trimmed the corners before turning.  I'd recommend that the edge with the opening have at least a 1/2 inch border to make closing it easier.   (Edited on February 7th, 2013)  WHY DIDN'T I AT LEAST READ OVER THIS TUTORIAL BEFORE MAKING SOME OF THESE FOR MY OWN BABY?  DUH!!!!!  I MADE 10 OF THESE THIS EVENING AND IGNORED MY OWN ONCE-LEARNED-BUT-QUICKLY-FORGOTTEN-LESSON.  SIGH.


If you need step by step directions, here ya go:
1.) Cut up old towel into desired sizes.  If it is a thick towel, stains may be visible only on a single side.  Note:  Cutting was nearly impossible with the super-thick towel I used for scissors.  I used my rotary blade.  A not-too-thin magazine is a nice template, too. (Example: Reader's Digest)
2.)  Cut up some cotton scraps.  You can also piece or applique or whatever.  Old shirts would be good, too.  Jeans.  Whatever looks pretty/cool/groovy to you.
3.)  Sew.  Backstitch at the beginning and ending parts.  I experimented with making nice sharp turns and curving.  I doubt that it matters, but I thought the sharp turns were better looking. 
4.)  Trim corners. 
5.)  Turn/Birth/Flip inside-out. 
6.)  Hold the opening closed and start stitching there to finish the edges. 

I used half the towel and got 6 out of it.  I will used the other portions to make something else.  If your sewing machine can't handle the bulk, use a thin towel or maybe flannel.

I used no pins.  I thought about it, but eh...why bother...it is a single shape.  I have seen these online with decorative rickrack, in circles, etc. 
Click here for a site with a few choices of ideas

Click here for another site with lots of ideas


Friday, August 12, 2011

My own homemade kettlebell

Last night I made my first kettlebell.  We will see how well it turns out, but I am very hopeful.  It is still curing outside on my toolbox and will have the entire weekend to rest before I start playing with it on Monday.

Here are 3 links that you may find helpful:
10$ Kettlebell
Homemade Kettlebell
Kettlebells from pipes that you can use with your own weights

There at lots of different sources for information, but this guy really seems to be the best guru of info and avoids stupidity in his instructions.  In other words, it would be hard to actually hurt yourself by following his advice.

Here's mine:

Cost:  60 lb bag of Quickrete=around 3$
          1 precut length of PVC-1$ (Back corner of the store--apparently this is popular enough to have lots of choices)
          1 green ball-4$ 
          Various screws from bottom of my tool box
_______________
            About 8$ including taxes here in southwest Houston
I mixed up about 8 cups of Quickrete and then mixed up some more.  All total, I used under 1/2 the bag.  This filled it up some way, but not to the top.  I might make another one next week that is completely full (and heavier).

Here it is in my freezer.  Yeah, there isn't much to eat to eat in there right now.  I flipped a cookie sheet over and baked it at 300 for 10 minutes.  It was very bendable but not very floppy.  I had not pre-filled it with sand as others had because, frankly, I could see no purpose in it.  I just shaped it with my oven mitts and ran the bends under tap water to make them hard enough to not hold it in the freezer.  I left it there all of maybe 3 minutes while I mixed concrete.

I am a bit on the paranoid side so I elected to put some screws in the bottom to give it some more sticking-power.  I drilled these in at an angle from inside the tube.  The outside is slippery and I had no idea how else to drill it so I just stuck my drill bit down the tube and ta-da.  I then screwed/shoved the screws in.  They are not particularly secure but I don't believe it makes a difference when encased in concrete.

~~~~~~~
Edit-August 29th, 2011
I have been doing this for 2 weeks now and I can feel a distinct difference in my strength, flexibility, and yes, believe it or not, in my winded-ness when climbing stairs.  This is sheer GENIUS!

Thursday, August 4, 2011

Hospital Survival Kit and Cat toys

Someone in my family is at her due date so I printed out the items to stick on the paper bag and filled it with some goodies--peanuts, gum, sudoku puzzles, hair bands and pins, and a can of blended juice along with a few other items. I hope these help them to have a more comfortable experience.  I'll add the pictures later.
Here's the link to download the printables:
Hospital Survival Kit
I also made a couple of cat toys.  I took an old pill bottle and put a few nuggets of cat food in it to make a rattle, made a little catnip pillow, and stitched elastic all around it in a ray pattern.  I included some waterproof paper (from a map that I have sliced and diced for another project) and made a handle out of some satin ribbon for extra texture and to make a handle to protect human hands.  I also put on a "tail" of slices of pretty fabric.
I had actually made one last night, but my own cat went crazy for it and claimed it so I had to make another one.  My cat actually was wild last night and made loads of noise and was banging around everywhere.  It is pretty easy--texture and stringy parts are fun.  A bit of weight seems to add to the pleasure for the typical cat--perhaps it helps them to pretend they are tormenting a carcass.


~~~~~~~
Edit: August 12, 2011 to add pix
Cat toy #2.  Here, you can see how I traced a circle then free-handed a bigger one, cut out even bigger of the two fabrics, and then was laying some elastic samples around the edges for kitty fun.

Here's the top sewn together beside the ribbon handle.  I put some cat food kibble in the pill bottle, put that in the sock, and put it all inside with stuffing from old jeans and some plastic-y paper for sound differences.

Ta-da!  Front.

Voila!  Back.

Here's the hospital survival kit.  If you make one, be aware that lots of people probably mean someone else has already brought loads of stuff.  I think one person had brought up a cooler of things.  Mine was simple and intended to be easy and disposable (not more crap to keep up with) but it was entirely without value in the commotion of everything going on. I hope the choices of the contained items were useful, if not to the couple, then to the staff on duty.   This would probably be a great item to anyone who has been in the hospital for a few days, too.

~~~~~
Edit August 18th
Lady bug toy that is way cuter than what I made!

Wednesday, August 3, 2011

Laundry Soap DIY ("Detergent" was removed from title--see edit)

I have read for years about folks making their own laundry detergent soap and finally gave it a try in January.  I am rather pleased with the results and want to share my own recipe with you.

I was always a Cheer or Tide user and loved the way the fragrances seemed to mask most of the funky odors that happen so frequently in this humid environment that is Houston.  But, of course, they are costly and I do like to wear my own perfume when I want a fragrance.  Cheer+Glamourous is not exactly the sexiest combo.  Often, when I am at work, it seems that Latino folks like to really, REALLY use a lot of the detergents because I can recognize the brands on their clothes.

I have been a faithful Downy user, also.  My clothes never felt so soft and I could not understand.  I learned several years back that most recommended detergent levels can't be washed out.  The test was to take a load of laundry and wash it without any additives while leaving the lid open.  The typical machine will wash but stop at the point where it should drain.  You then look in and, voila, see how much sudsing is there.  Since laundry detergent is made to suds up very little and you have used zero detergent for this load, you should see zero.  Reality for me was that it took washing without ANY detergent for 6 full weeks of normal washing to get all the sudsing to cease.  I then only used a couple of tablespoons per load after that, except when things were smelly.  Teenager in home=smelly laundry.   I used the Downy for this reason.

Come around to January 2012.  Aaahhhh... I thought I would try a recipe that I had found and just see how I like it.  It took me all of maybe 10 minutes to make and I was in business.  The first load, well, my clothes still seemed a bit stiff and not so pretty-smelling.  Apparently, the perfumes used in the store-brands wash out quickly.  Since I had made up 2 yogurt containers of it, I figured I'd use it all up.  Lo and behold, after the first few washes, when all the crud from the commercial detergents was all washed out, my clothes are super fresh smelling and very soft.  I now only have the Downy for traveling.  (Some cities have so much pollution that your clothes reek of it!  Quito and Lima, por ejemplo!)

I can feel the difference in the clothes that I pull out of the closet.  That is the biggest proof to me.

If you try it, you might like it.  If you don't, well, you are only out about 6$ for supplies and they can be used in other applications.

Emily's Laundry Soap Recipe
Equal parts:
     Soap (I use Ivory)
     Washing Soda (different PH than baking soda)
     Borax

Step 1: Unwrap the bar of soap.  Microwave it in the center of the plate that is part of your machine for 4-5 minutes.  Seriously.  Watch this.  It is great. (Don't believe me?  Youtube it!)
Step2:  Take the plate out and let it cool for several hours.  Really, you are letting the moisture out and it is easier.  Not necessary, but easier.  I do this before bed.
Step 3:  Measure this into a bucket in equal parts.  I like to go outside and sift the Ivory powder into a large bowl and measure a cup of this, cup of that, etc until it is all in the bucket.  Stir.  Put it in the containers you want. (See the edits below.)

That's it.  Seriously.  I use a couple of table spoons per load but if I am grossed out by my own laundry, I use a spoon or two more.  It is really nice to have clean smelling clothes, sheets, towels, etc without all the perfumes.  As a bonus, I don't seem to suffer from my allergies as much and my skin sensitivities have decreased.  Woohoo!

Note:  Whatever detergent/soap you use, for traveling and hand-washing in the sink, I recommend that you put some in the blender and grind it to the finest powder.  It is so much easier when all you have to wash with is COLD.
Note #2:  For traveling by personal vehicle, you can use a cooler for a washing machine.  Load your laundry, sprinkle your detergent, fill with water.  Load in back of vehicle.  Drive 1/2 way to your next destination or drive to town or whatever.  Use the spigot to drain the laundry and fill with water again to rinse.  Continue with your driving.  The gentlest wash-cycle possible!
Note #3:  If you wanna grate the soap instead of nuking it, knock yourself out.  But nuking is more fun and works better, IMHO.

Say goodbye to dirt and grime with these babies.

Ivory soap after it has been nuked.  The "cloud" was just mashed up with my hands. Nothing more.

In this last batch, I used 3 bars of Ivory.  It was too much.  I have 2 yogurt containers plus the washing soda box full and one gallon zip bag 1/2 full of powdered Ivory for the next batch. Since January, this is the 3rd time I have made it and the first double batch.  I would estimate that for $10, a single person such as myself can have enough laundry detergent for a year. I still have several bars of soap left so I possibly won't need to buy that for 2 more years.
Edited to add:
My sister is a genius!  She quarters the soap and puts it into a paper lunch bag to nuke it so that it is nicely contained and there is no mess.  I'm definately gonna try this next time!  Thanks, Charlene!
Edited to add - Jan 4, 2014:
1.)  I now use a flour sifter to mix up the ingredients over my paper bag that contains the parts.  It makes it have zero chunks in it and is, IMHO, faster. My husband mixes it up when we need it nowdays. Washing the cloth diapers means that we do go through it more often.  2.)  The soap will dry out.  I now nuke all the soap at once and put the extra in the paper bag where I keep my other ingredients. 3.)  Also, I have learned the difference between detergent and soap--Soap is natural.  Detergent contains petroleum products

Kindle-Make your own custom cover

I love my Kindle.  I used it to keep contact with my family while I was traveling in South America and it is, of course, perfect for a traveler who enjoys reading.  I have a hard time focusing on one thing at a time, so with that, I can jump from book to book, too.

I needed a cover.  As great as the Kindle is, it is still rather fragile.  I have to send mine back to have the screen replaced because of an unfortunate accident before I had my cover.  Lesson learned.

I have now made two.  The other is a gift, and when that person has it in hand, I'll post the pix of the other one and explain my changes.  This one was my first attempt.  You basicly make a long pocket, put firm, durable protectors in at various levels, and sew seams to keep them in place.  It protects it as well as makes a stand.

Here are my pictures followed by the link:

make-a-custom-kindle-cover-case

~~~~~~~
Here is one that I made on Monday after using the other one.  With that one, the Kindle sometimes slid out the side or the top if my hand went limp (sleep--zzzzz) in bed.  Twice it hit the floor because of sliding out soooooo....I made another one.

Leftover fabric from a skirt.  I bought it with the embroidery on it.

I braided some elastic for the "holder". 

I made some double fold non-bias tape to surround the Kindle and sort of "cradle" it.  If I make this again, I'll put some very thin wooden dowels in there.  The elastic on the other side makes it look wonky.  I am also going to refinish the green border--I didn't realize that was blue thread in there.

Here's a small pocket to tuck in a book light.

Tuesday, August 2, 2011

Quilts I have made

Here are pix of some of the quilts that I made in the past.  I posted up pix of the rest of them at Craftster, if you care to view them.  I have written descriptions and responses to questions over there also.  Quilting with Blondgirl

This first pic shows some of the folks in the family signing the signature blocks for the family quilt.


Blue Jeans Scrap Quilt


Here is a link to a tutorial that I posted on Craftster a couple of years ago.  I have that quilt here beside me on the sofa right now and it is my favorite for using on road trips and for my bed in the winter.  I worked on it in the evenings and when I was stressed out during one month that summer.  It went together quickly and was a delight to make.  I plan to make another, perhaps with regular cottons for the backs of the blocks.  Maybe the next one will be in a diamond pattern or....  So many possibilities.  It is nearly impossible to decide!

Bonus:  I took the upper parts of the jeans that weren't so great for recycling into quilting blocks and made a dog bed.  There is not a tutorial, but the photo here is pretty self explanatory and the zipper area allows for de/restuffing and washing.

Blondgirl's verision of a Jeans Rag Quilt (Instructions/Tutorial/Tut/Tute)

I'd really love to see your own interpretations.  Please send me pix or links to your images.  Any details you want added would be awesome, too.

Hi.

This is my first post and I am trying to figure this all out.  Please try to have a bit of patience with me as I learn how to display things here.  Judging from all the others that I have enjoyed, improvements are sure to follow.

My goal here is to provide a list of various projects that inspire me along with my actual successes (and disasters!).  One of the things I would like to see here is for the comments list to only have useful comments.  I find it frustrating to see a project that seems a bit vague with a long list of comments to wade through.  It take forever to get past all the "Wow!  This is awesome!  I am totally gonna try this one day!  You rock!  You are so creative/smart/handy/etc! Event though I am never going to do anything with this information, I am still going to clutter up this page with lots of words."

I really want and appreciate actual feedback that is constructive or contains questions that I might be able to answer more clearly.  If you have also made the project, I would love to display your pictures--just email me!

:)